
WooCommerce Barcode Generator Plugin Overview #
The WooCommerce barcode generator plugin provides a seamless solution for creating and managing barcodes for your products. Each barcode is linked to your product metadata and can be displayed in various locations throughout your store. The plugin is highly flexible, allowing you to decide what product data should be used to generate the barcode.
How to Set Up Product Barcodes #
Setting up product barcodes is simple and straightforward:
-
Activate the Plugin:
Once you install and activate the WooCommerce Barcode Generator plugin, barcodes will be automatically generated for all existing products using an Auto Barcode number. -
View Barcodes:
After activation, the generated barcode will be visible on the single product page for each product. -
Customize Barcode Settings:
To modify the barcode values, adjust the design, or choose which product data to use for barcode generation:-
Go to your WordPress Dashboard.
-
Navigate to the WOO Barcode plugin menu.
-
Click on the Barcode Settings tab.
-

Supported Barcode Types #
The WooCommerce Barcode Generator plugin supports 4 different barcode formats to suit various business needs and industry standards. When you activate the plugin, barcodes will be automatically generated for your products.
Important:
If your barcode number does not meet the specific requirements of a selected barcode format, the plugin will automatically default to Code 128 (Auto) to ensure the barcode is still generated and functional.

📋 Available Barcode Formats #
| Barcode Type | Description | Requirements |
|---|---|---|
| CODE128 (Auto) | Works with product SKU or ID. Auto-detects and adjusts as needed. | Numeric or alphanumeric |
| EAN-13 | Standard retail barcode format used globally. | 13-digit numeric code |
| EAN-8 | Compact version of EAN-13 for smaller products. | 8-digit numeric code |
| UPC | Widely used in North America for retail products. | 12-digit numeric code |
Note:
For formats like EAN-13, EAN-8, UPC, and MSI variants — make sure to provide numeric codes of the correct length, including valid check digits when applicable. If your input does not meet these requirements, the plugin will automatically use CODE128 (Auto) for safe and seamless barcode generation.

Barcode Number Source #
The WooCommerce Barcode Generator plugin gives you full control over what data is used to generate each product’s barcode. You can select from three different options based on your store setup and inventory management preferences.
This setting determines the value that will be encoded within the barcode.
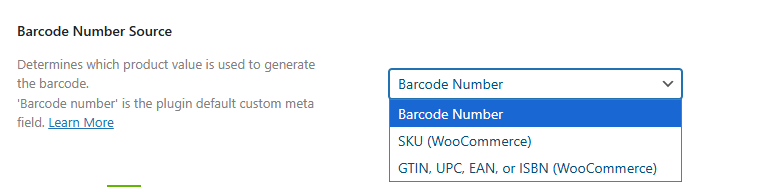
📌 Available Barcode Content Options #
| Option | Description |
|---|---|
| SKU (WooCommerce) | Barcodes will be generated using the SKU (Stock Keeping Unit) assigned to each product in your WooCommerce store. |
| Barcode Number (Plugin Default meta) | The plugin will automatically generate unique barcode numbers for each product. This is the default option. |
| GTIN, UPC, EAN, or ISBN (WooCommerce) | Barcodes will be generated using the product’s GTIN, UPC, EAN, or ISBN value (entered in the product’s inventory fields). |
| EAN for WooCommerce (3rd Party Plugin) | If you’re using a third-party EAN for WooCommerce plugin, this option allows barcodes to be generated based on the EAN field provided by that plugin (found in Product Edit > Inventory). |
How to Select Barcode Content:
-
Go to your WordPress Dashboard.
-
Navigate to WOO Barcode > Barcode Settings.
-
Find the Barcode Number dropdown.
-
Choose your preferred option from the list.
-
Save changes.
The plugin will immediately start generating barcodes based on the selected value for all products.
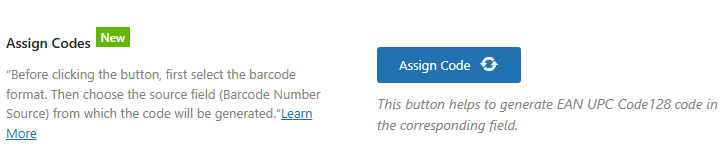
Assign Codes: #
This button helps to generate EAN UPC Code 128 code in the corresponding field.
Select Barcode Sticker #
The WooCommerce Barcode Generator plugin offers two types of barcode sticker designs for your convenience. You can easily select the one that best fits your product packaging or inventory labeling needs.
You’ll find two sticker designs available:
-
Sticker Type 1: A classic, clean layout ideal for basic product labeling.
-
Sticker Type 2: A slightly enhanced design that includes additional product details alongside the barcode.
Simply select your preferred sticker style, and it will be applied to all barcode displays and printable labels.
Tip: You can preview the designs within the settings before finalizing your choice to see which layout works best for your store.
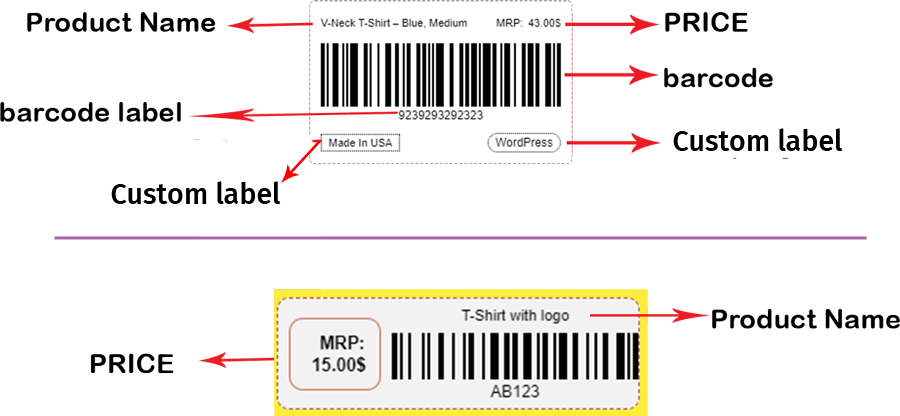

Barcode Label #
The Barcode Label refers to the human-readable text displayed either above or below the barcode image — typically showing the barcode number or content value.
The WooCommerce Barcode Generator plugin allows you to fully customize how this label appears on your barcode stickers.

📌 Barcode Label Settings #
| Setting | Description |
|---|---|
| Display Label? | Enable or disable the display of the barcode label on the barcode sticker. Toggle this option based on your preference. |
| Font Size | Set the size of the barcode label text. You can choose a value between 10 and 30 for optimal readability. |
| Text Margin | Adjust the vertical spacing (margin) between the barcode image and the label text. The margin can be set from 0 to 10. |
| Font Option | Choose the style of your barcode label text. Available options include: • Normal • Bold • Italic • Italic-Bold |
| Text Align | Set the alignment of the barcode label text. Choose from: • Center • Left • Right |
How to Customize Barcode Label Settings #
-
Go to your WordPress Dashboard.
-
Navigate to WOO Barcode > Barcode Settings.
-
Scroll down to the Barcode Label section.
-
Adjust the options to your liking.
-
Click Save Changes to apply your settings.
Your barcode stickers will now display the label according to your selected styling preferences.
Product Title Markup #
The Product Title Markup section allows you to control the typography and display settings for the product title on your barcode stickers. This gives you the flexibility to add product names directly onto barcode labels and customize how they appear.

📌 Product Title Settings #
| Setting | Description |
|---|---|
| Display Title? | Use the dropdown to choose whether or not to display the product title on the barcode sticker. |
| Location | Set the position of the product title on the barcode sticker. Options may include positions like above or below the barcode. |
| Font Style | Choose the style of the product title text. Options: • Normal • Italic |
| Font Weight | Control the thickness of the product title text. Options: • Normal • 600 • 900 |
| Transform | Adjust the text casing for the product title. Options: • Default (as entered) • Capitalize (first letter of each word uppercase) • Lowercase (all lowercase) • Uppercase (all uppercase) |
| Font Size | Set the font size for the product title in pixels. • Default: 11px • Range: 8px to 40px |
| Title Color | Choose the color of the product title text using a color picker tool. |
How to Customize Product Title Markup #
-
Go to your WordPress Dashboard.
-
Navigate to WOO Barcode > Barcode Settings.
-
Scroll to the Product Title Markup section.
-
Adjust the typography and display options according to your preferences.
-
Click Save Changes to apply your settings.
The product titles on your barcode stickers will now reflect your customizations.
Product Price Markup #
The Product Price Markup section allows you to control how the product price appears on your barcode stickers. You can choose whether to display the price, adjust its typography, and customize its layout.

📌 Product Price Settings #
| Setting | Description |
|---|---|
| Display Price? | Use the dropdown to decide whether to display the product price on the barcode sticker. |
| Location | Select where the product price should appear on the barcode sticker — for example, above or below the barcode. |
| Prefix | Enter any text you’d like to appear before the product price (e.g., $, USD, Price:). |
| Prefix Placement | Set how the prefix is positioned relative to the price. Options: • Row (prefix before price) • Row Reverse (price before prefix) • Column (prefix above price) • Column Reverse (price above prefix) |
| Font Style | Choose the font style for the product price text: • Normal • Italic |
| Font Weight | Adjust the thickness of the product price text. Options: • Normal • 600 • 900 |
| Font Size | Set the font size for the product price in pixels. • Default: 11px • Range: 8px to 40px |
How to Customize Product Price Markup #
-
Go to your WordPress Dashboard.
-
Navigate to WOO Barcode > Barcode Settings.
-
Scroll to the Product Price Markup section.
-
Configure the display, layout, and typography options as needed.
-
Click Save Changes to apply your settings.
Your barcode stickers will now display the product price according to your customized preferences.
Price Behavior #
The Price Behavior settings allow you to control how product prices are displayed on your barcode stickers — whether you want to show both the regular and sale price, only the active price, or customize their styling.

📌 Price Behavior Settings #
| Setting | Description |
|---|---|
| Choose Behavior | Select how the product price should be displayed: • Default Price: Displays both the Regular Price and Sale Price (if available). • Current Price: Displays only the Regular Price, or the Sale Price if the product is currently on sale. |
| Placement | Set the layout positioning for the displayed price values. Options: • Row (side by side) • Row Reverse (reverse order) • Column (stacked vertically) • Column Reverse (stacked vertically in reverse order) |
| Current Price / Price Color | Choose the color for the Current Price text and any associated prefix text. |
| Del Color | Select the color for the Deleted Price (the price struck through when a product is on sale). |
How to Configure Price Behavior #
-
Go to your WordPress Dashboard.
-
Navigate to WOO Barcode > Barcode Settings.
-
Scroll down to the Price Behavior section.
-
Choose your preferred display behavior, layout, and colors.
-
Click Save Changes to apply your custom pricing display on barcode stickers.
Example:
-
If a product has a Regular Price of $20 and a Sale Price of $15:
-
Default Price shows:
$20 $15 -
Current Price shows:
$15(if the sale is active)
-
📌 Additional Barcode Sticker Customization Settings #
These settings let you add extra custom labels and style options to your barcode stickers, such as Country of Origin, Brand Name, and color customizations for the barcode itself.
Custom Text -1 / Custom Label -1 #
Add a custom country of origin label to your barcode sticker.
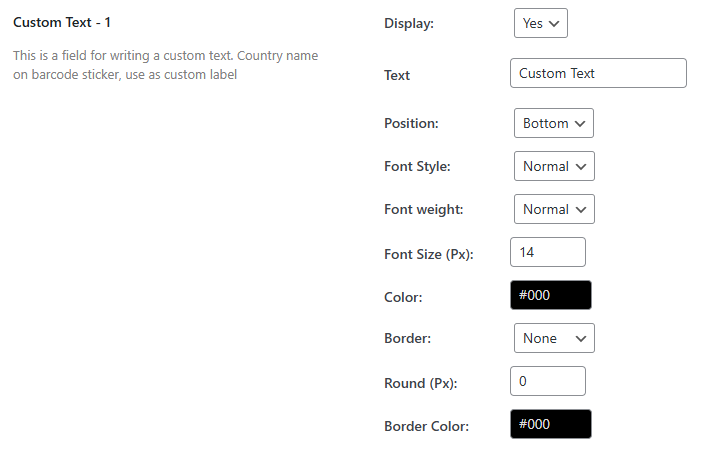
| Setting | Description |
|---|---|
| Display? | Choose whether to show the Country of Origin text on the barcode sticker. |
| Text | Enter your custom country text (e.g., Made in USA). |
| Position | Set where the country text appears on the sticker. |
| Font Style | Choose between Normal or Italic text. |
| Font Weight | Set the font weight to Normal, 600, or 900. |
| Font Size | Define the font size in pixels. • Default: 11px • Range: 8px to 40px |
| Border | Option to add a border around the custom country text. |
| Round | Add a rounded shape border around the custom text label. |
| Border Color | Choose the color of the border around the country text. |
Custom Text -2 / Custom Label -2 #
Similar to custom text-1, this lets you display a custom Brand Name on the barcode sticker.

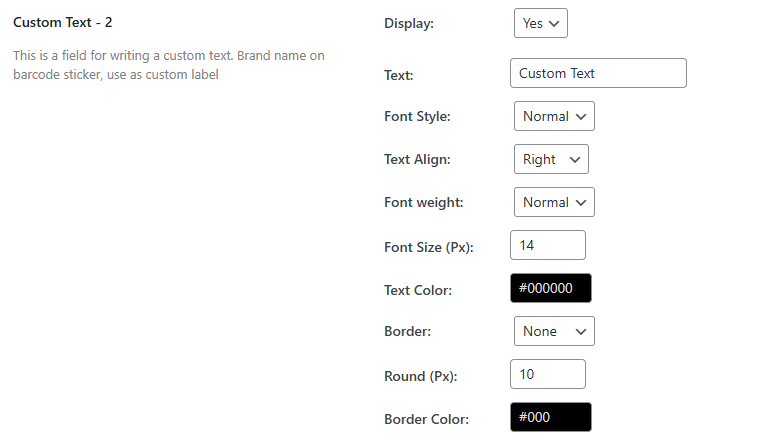
| Setting | Description |
|---|---|
| Display? | Choose whether to show the Brand Name on the barcode sticker. |
| Text | Enter your custom brand name (e.g., ABC Co.). |
| Position | Set where the brand name appears on the sticker. |
| Font Style | Choose between Normal or Italic text. |
| Font Weight | Set the font weight to Normal, 600, or 900. |
| Font Size | Define the font size in pixels. • Default: 11px • Range: 8px to 40px |
| Border | Option to add a border around the brand name text. |
| Round | Add a rounded shape border around the custom text label. |
| Border Color | Choose the color of the border around the brand name text. |
📌Position Settings for Barcode Sticker Elements #
Easily control where your Product Price, Product Title, and Custom Text Labels appear on your barcode stickers.
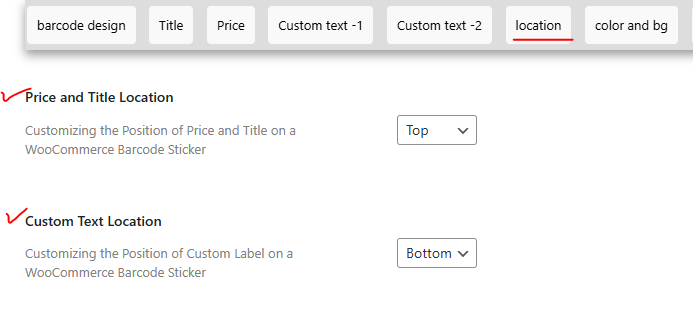
Price & Title Location #
Customize the display position of the Product Price and Product Title on the barcode sticker.
| Setting | Description |
|---|---|
| Top | Displays the Price or Title above the barcode. |
| Bottom | Displays the Price or Title below the barcode. |
Custom Text Location #
Control where your custom text labels (such as Country of Origin or Brand Name) appear on the barcode sticker.
| Setting | Description |
|---|---|
| Top | Displays the custom text label above the barcode. |
| Bottom | Displays the custom text label below the barcode. |
Barcode Color & Size #
Control the appearance of the barcode itself to ensure optimal readability and scanner compatibility.
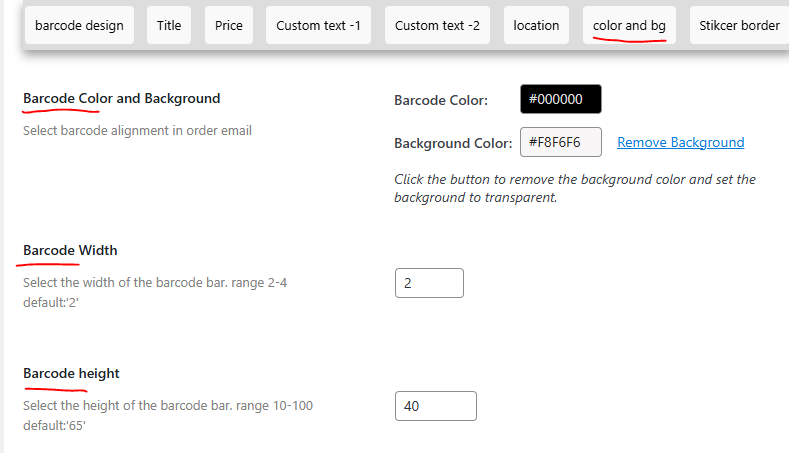
| Setting | Description |
|---|---|
| Barcode Color | Choose the color of the barcode lines. |
| Background Color | Select a background color for the barcode sticker. 📌 Use light background colors for better scan accuracy. |
| Barcode Width | Set the width of individual barcode bars. • Range: 2 to 4 • Default: 2 |
| Barcode Height | Define the height of the barcode bars. • Range: 10 to 100 • Default: 65 |
📌 Sticker Border Customization #
Enhance the appearance of your barcode stickers by adding a border around the entire sticker. You can adjust the border type, border color, and border radius to match your design preferences.
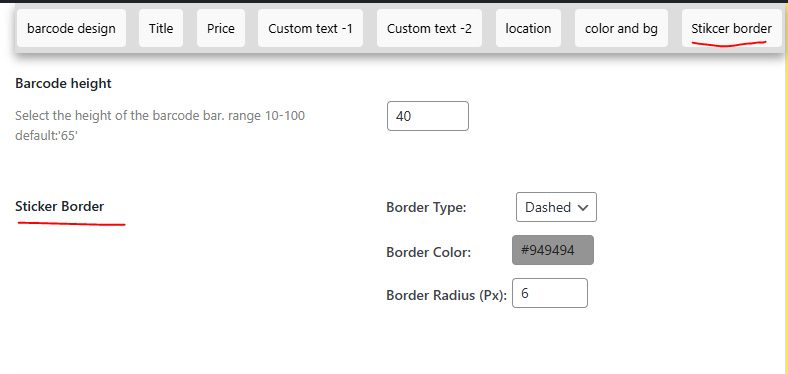
Sticker Border Settings #
| Setting | Description |
|---|---|
| Border Type | Select the style of the border around your barcode sticker. Options: • Solid • Dotted • Dashed • None |
| Border Color | Choose the color of the border. You can select a color using the color picker tool. |
| Border Radius (Px) | Set the border radius (rounded corners) of the sticker border in pixels. • Default: 0px (no rounding) • Adjust this value to create rounded corners (e.g., 5px, 10px). |


